Instruction for Creating Discrete Games with Tree Editor
Basic Elements of Tree Editor
Creating a New Tree
- Determining Sequence of Events
- Editing Chance
Probabilities
- Editing Choice Names
- Editing Player
Label
- Editing Labels in General
- Editing Information
Sets
- Deleting
Information Sets
- Editing Terminal
Nodes (Payoffs)
- Payoff Information Sets
- Aligning payoffs
- Labeling payoffs
- Stages
- Transitional matrices
- Rearranging Positions of Nodes
- Viewing Node Numbers
- Testing a Game
Saving a File
Running an Experiment
- Determining Session Parameters
- Experimenter/Instructor Viewing the Game
- Viewing Experimental Results
Instructions to Players given by the
Instructor
- Players Connecting to the Experiment
- Opening a Game by Players
- Waiting for other Players to login
- Choosing Moves by Players
- Basic Elements of Tree Editor
|
|
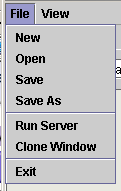
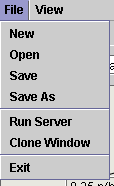
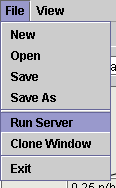
The File menu
allows the instructor to create new files, open existing files, save files, run games,
open a new tree editor by selecting Clone Window and to exit from the tree editor. |
|

|
The View has only the refresh
command. |
|

|
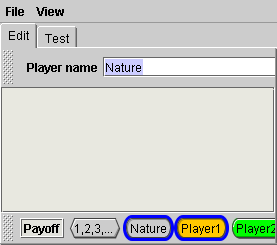
The Payoff icon represents
a terminal node and allows the instructor to determine the players' payoffs
for each possible outcome. |
|

|
The Nature icon allows
the instructor to determine probability distributions over exogenous events. |
|

|
The Player icon allows
the instructor to determine who is involved (i.e. the set of players). |
Return to the Table of Contents
- Creating a New Tree
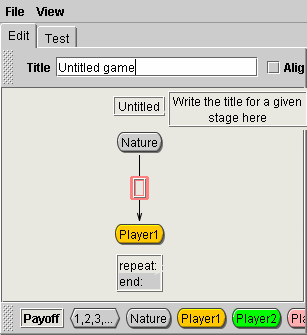
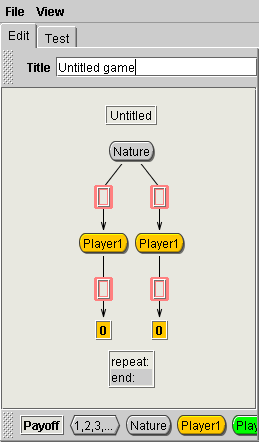
To create a new tree
From the File menu, choose New
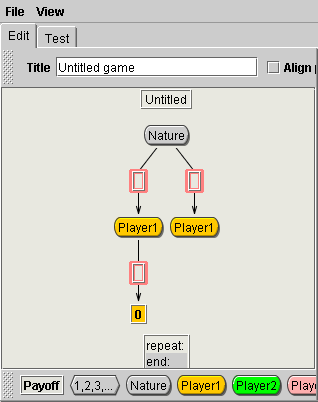
Determining Sequence of Events
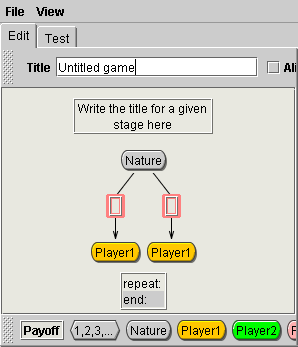
Adding nodes
Return to the Table of Contents
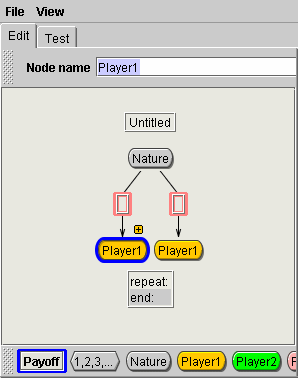
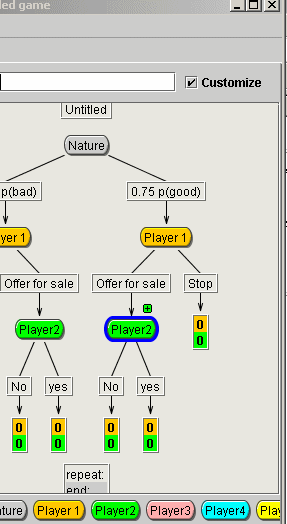
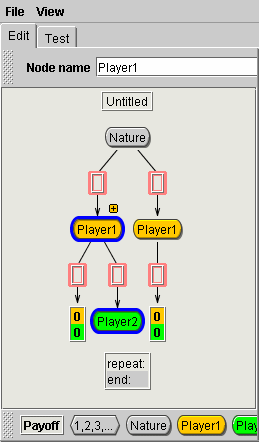
To delete a branch:
-
click the mouse on a predecessor node (i.e. Player 1),
and drag it to a successor that you want to delete (i.e. Player 2).
Note that both, Player 1s and Player 2s icons have to
be highlighted in blue. |
A branch that connects
the predecessor and the successor decision node is erased as well as the
successor decision node (in our example Player 2 decision node).
Note that the payoffs are updated simultaneously on
all the terminal nodes when a player is deleted from the tree diagram. |
|
|
|
Return to the Table of Contents
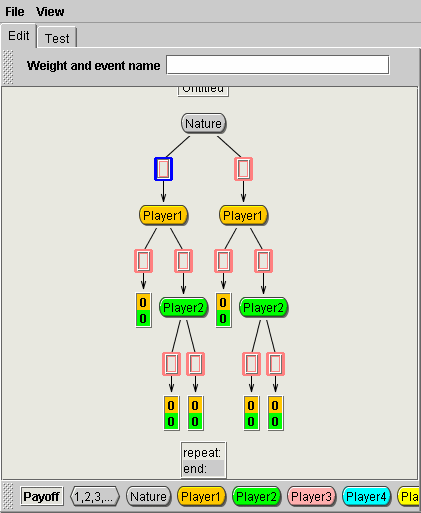
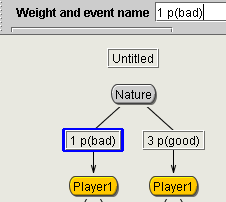
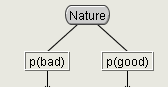
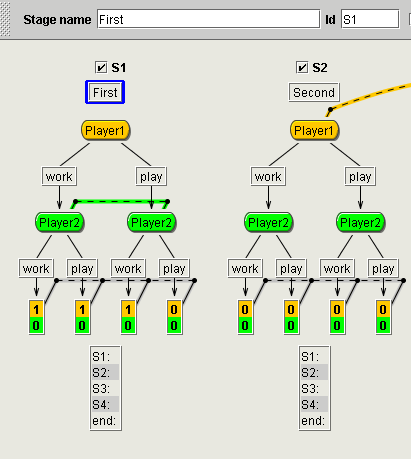
- Editing Chance Probabilities
| A chance node has a default label "Nature"
(the name can be changed by the instructor), and the branches that follow
the chance node would be determined by some random mechanism, according
to the weights or probabilities that a moderator writes into the empty
rectangles (by default each branch is empty).
To edit chance probabilities on branches:
-
click on a rectangle that is located in the middle of
a branch (in our example the left rectangle). Once the rectangle is
selected it is highlighted in blue.
|
|
|
-
Write the appropriate weight in the selected rectangle or at the
top where Weight and event name appears. The title appears only if event
rectangle is selected.
In our example the left event was given the weight 1,
and the right event was given weight 3 (1/4 probability for the
left alternative, and 3/4 probability for the right alternative). Note that the
weights will appear on the subject's screen in this case.
Every event can also have a name.
- Write the appropriate label (Note
that naming alternatives is optional.). The space between the number and the
following character represents a label.
- If a comma separates the weights
 and
the label, the weights are not seen while playing. and
the label, the weights are not seen while playing.
|
|
-
Weights can also be represented with probabilities.
Moderator has to be careful that the sum of probabilities is at the end one.
|

|
Return to the Table of Contents
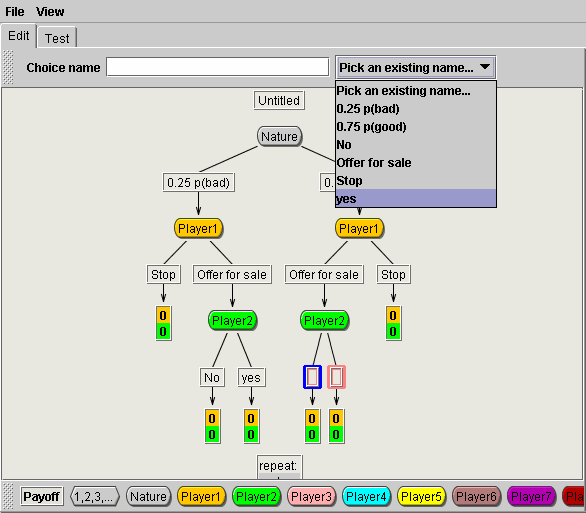
- Editing Choice Names
Each alternative at a node that is controlled
by a player should have a choice label. To edit choice labels on branches:
-
click on a rectangle that is located in the middle of
a branch (in our example the rectangle on the left branch of Player 2) or
select labels the inventory of the existing names that a program keeps. The box
 appears only if you selected a choice rectangle and at least one choice was
labeled.
appears only if you selected a choice rectangle and at least one choice was
labeled.
-
Write the appropriate choice name in the rectangle or pick an
existing name.
|
|
|
Return to the Table of Contents
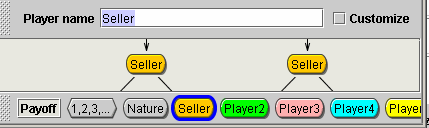
- Editing Player Label
- One option for labeling players is to write
the appropriate label by clicking directly on a player node in the tree:
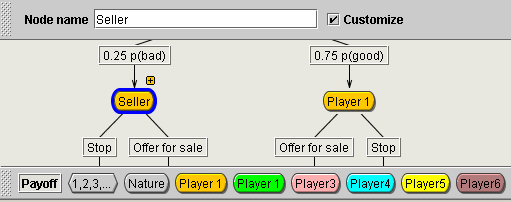
In our example Player 1s label was replaced with
 and and  option was selected. Note that the label for Player 1 was neither changed in
the other nor at the bottom of the tree editor.
option was selected. Note that the label for Player 1 was neither changed in
the other nor at the bottom of the tree editor.

|
Return to the Table of Contents
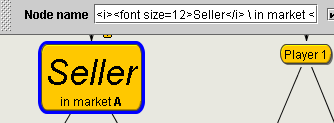
- Editing
Labels in General
- Html commands can be used to edit any label in the tree
editor. For example:
- \ to go to a new line
- <i> italic
- <b> bold
- <font size=number>
|
|
Return to the Table of Contents
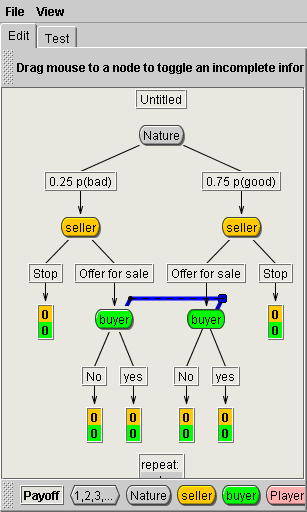
- Editing Information
Sets
- To edit information sets click on a any player node
and a plus sign appears
 above a node.
|
- Click on the plus sign of a player ( in our example the
buyer) and drag it to the target player) to toggle an incomplete information
set connection.

|
- By connecting the nodes in this set of player i (i.e. the
buyer) is depicted by a dotted line in the same color as player i (i.e. the
buyer).
-

|
| The nodes can be connected between
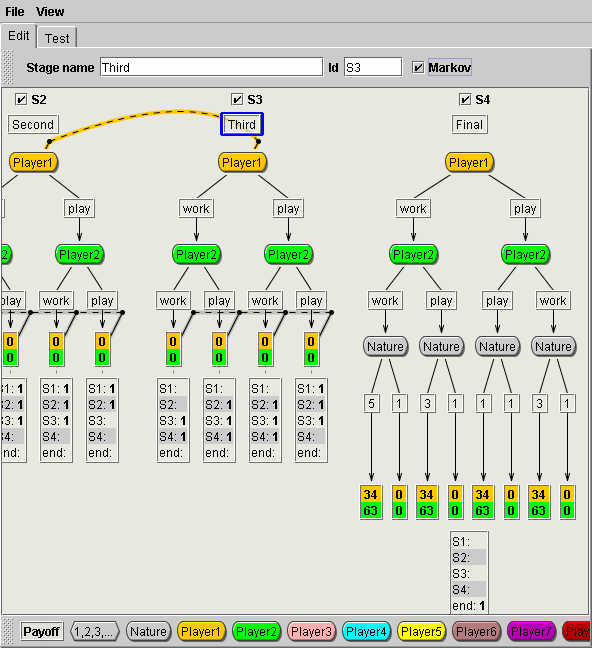
the stages as well. In this case players do not know which stage they are in when they
are making a decision. In the example below Player 1 cannot distinguish
between second (S2) and Third (S3) stage. |
|
| The set of choice names following the
two nodes must be the same if the two nodes are controlled by the same
player in the same information state. If choice names do not match, they
are highlighted red to warn the instructor that the game is not meaningful,
and the program will not allow the instructor to play the game. |
|
|
Return to the Table of Contents
- Deleting Information Sets
To delete the set of nodes that
cannot be distinguished by a player
-
click on a player and the plus sigh will appear at the top
 of player i (in our example
the buyer) and drag it to the target player i (the buyer) just
below the plus sign. The dotted line will disappear.
of player i (in our example
the buyer) and drag it to the target player i (the buyer) just
below the plus sign. The dotted line will disappear.
|
|
|

|
Return to the Table of Contents
- Editing Terminal Nodes (Payoffs)
Return to the Table of Contents
- Payoff information sets
- To edit payoff information sets click on a
terminal node
and a plus sign appears
 above a terminal node and drag mouse to a terminal node to toggle an
information set connection.
above a terminal node and drag mouse to a terminal node to toggle an
information set connection.
|
|
|
Return to the Table of Contents
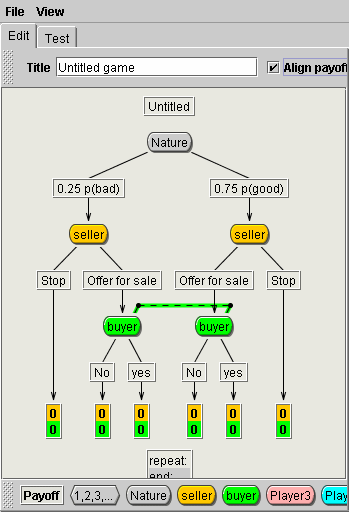
- Aligning payoffs
Return to the Table of Contents
- Labeling payoffs
Return to the Table of Contents
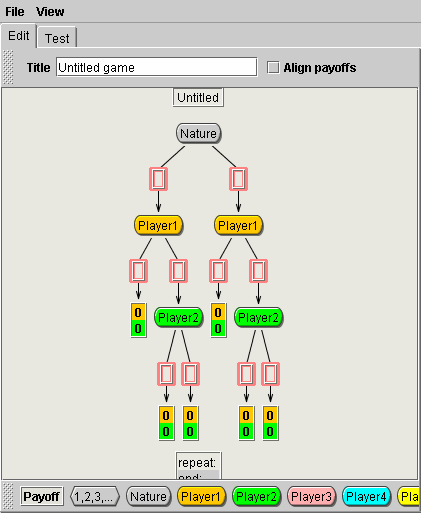
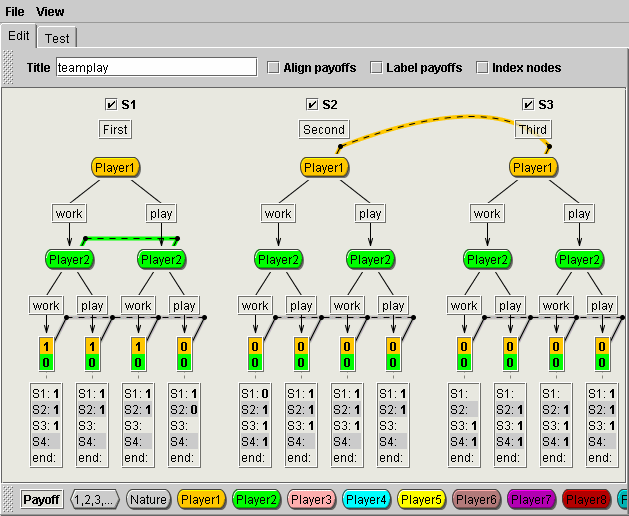
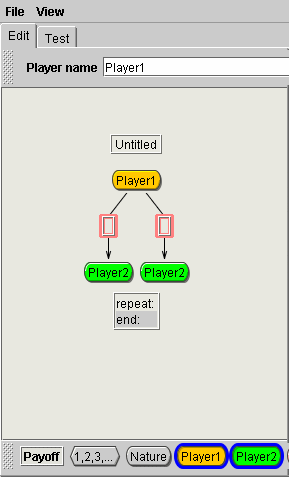
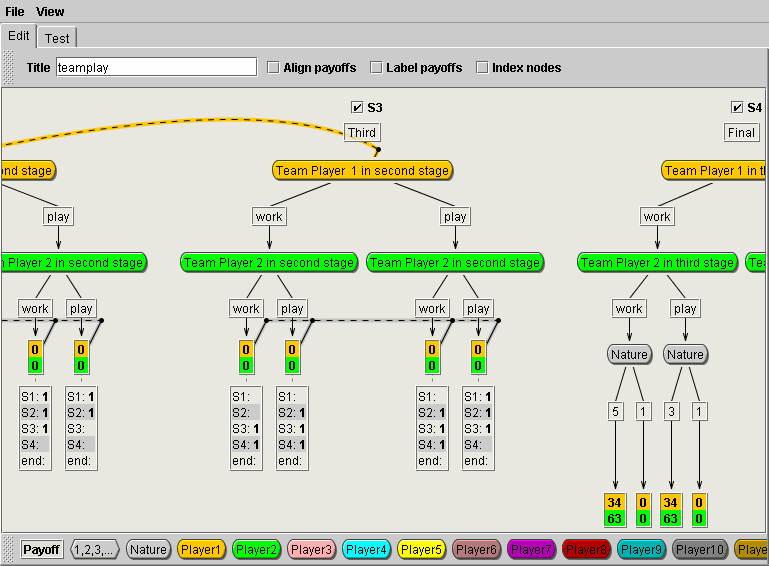
- Stages
- After building a tree like in the picture below click on
the player icon at the bottom of the editor and drag the mouse to another
player at the bottom of the tree to start creating the next
stage.
|
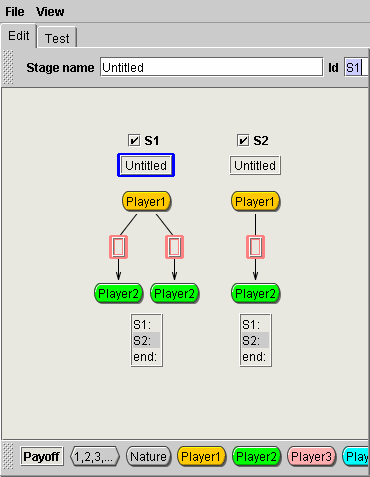
- A new stage (S2 in the picture below) can be created by
starting a new tree in the same way as the first tree was created. Note that
the number of stages is not limited. Just continue building new trees and
you will get automatically a new stage
created.
|
Return to the Table of Contents
- Another example of adding stages
|
|
Return to the Table of Contents
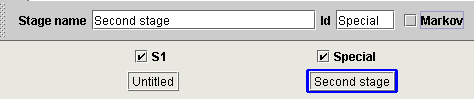
Each stage that is created has a
default name:  .
To edit a stage name click on
and change the stage name. The change of the stage game is not required. .
To edit a stage name click on
and change the stage name. The change of the stage game is not required.
|
- If only one stage is created then only a stage name can be
edited and
 transitional matrix can be defined (see transitional matrix for the
discussion on Markov/ stage games).
transitional matrix can be defined (see transitional matrix for the
discussion on Markov/ stage games).


- Both of these labels can be renamed by directly typing a
new name in the rectangle
 or in the rectangle after Stage name. ID name appears in the transitional
matrices at the end of the terminal nodes.
or in the rectangle after Stage name. ID name appears in the transitional
matrices at the end of the terminal nodes.
|
Return to the Table of Contents
- Transitional matrices
|
A stage game is a default option. To check it click on the stage name rectangle that is by default named
and should not
be selected just like in the picture below.

|
Return to the Table of Contents
- Transitional matrix
with only one stage defined in a stage game
Return to the Table of Contents
- Transitional matrix with more than
one stage defined in a stage game
|
- If
is not selected then only one transitional matrix appears at the bottom of
each terminal node.
 .
All the stages are listed and it is up to moderator to write the weights.
If the weight is omitted for a given stage that stage receives 0 weight by
default. In this example: .
All the stages are listed and it is up to moderator to write the weights.
If the weight is omitted for a given stage that stage receives 0 weight by
default. In this example:  stage S1 will be visited with probability 1/3, stage S2 with probability
1/3 and stage S3 with probability 1/3. Stage S4 and end will never be
visited.
stage S1 will be visited with probability 1/3, stage S2 with probability
1/3 and stage S3 with probability 1/3. Stage S4 and end will never be
visited. - All the editing features for the transitional matrices
corresponds to the explanation for one stage game
in a stage game.
|
Return to the Table of Contents
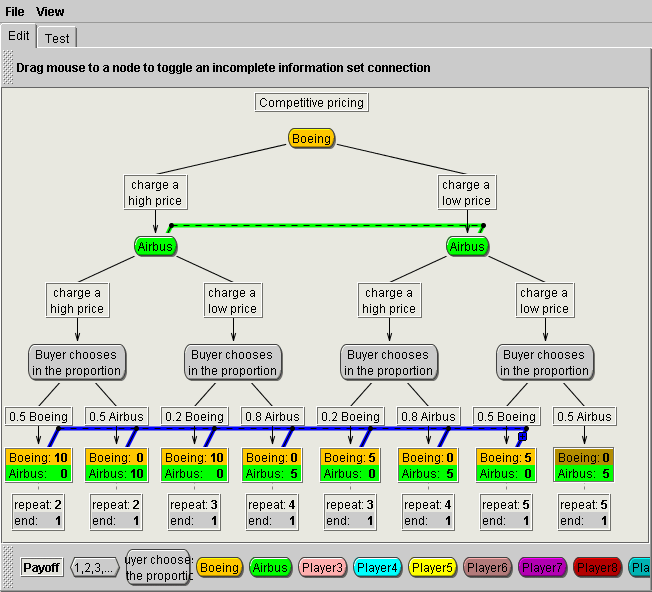
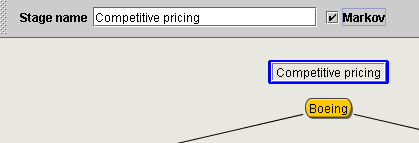
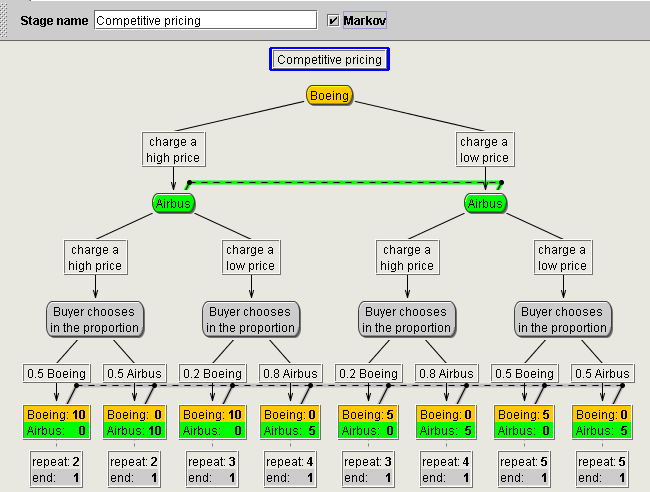
- Transitional matrix in a Markov game
|
To design a Markov game click on the stage name rectangle that is by default named
and  should
be selected just like in the picture below where the stage name was
changed to "Competitive pricing". should
be selected just like in the picture below where the stage name was
changed to "Competitive pricing".
|
- Transitional matrix in a Markov game with only one stage defined
- When
game is defined then transitional matrix appears below each of the
terminal nodes. Conditional on the terminal node reached moderator
specifies probabilities (weights) that the game is repeated or it ends.
See explanation for one stage game
for editing features for the transitional matrices.
|
Return to the Table of Contents
- Transitional matrix in a Markov game with only one
more than stage defined
- When
game is defined then transitional matrix appears below each of the
terminal nodes for the stages that have a Markov type game. Markov game
has to be specified for each stage separately. Conditional on the terminal
node reached moderator specifies probabilities (weights) that the game
is or it ends. See explanation for one stage game
for editing features for the transitional matrices. Below is an example
where the last stage (s4) is a stage game and the stages S1 to S3 are
specified as Markov games.
|
Return to the Table of Contents
- Rearranging Positions of Nodes
To reposition a
node
- click the mouse on the node that you want to
reposition and drag it after the node that you want the node to be
placed.
|
|
|
|
Return to the Table of Contents
- Viewing Node Numbers
| Each node is given
a number, which allows the instructor to distinguish between nodes when
the experiment is conducted, and the data analyzed.
To view Node numbers, click on
the background of the tree editor and at the top of the editor index nodes
appears as one of the options. Select  for viewing node numbers.

|
-
was selected for viewing the node numbers.
|
- Note that the game can be saved with the node numbers
so that players see node numbers while playing the game like in the
figure below.
|
Return to the Table of Contents
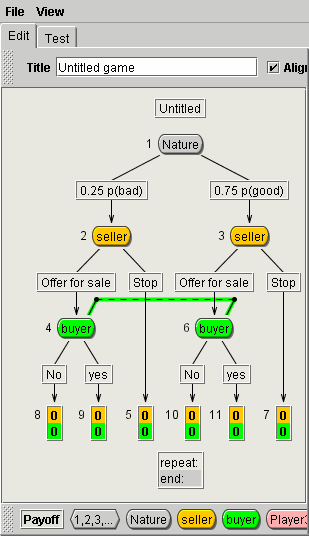
- Testing a Game
| The test option select Test
window
The instructor will be able to observe:
- How players will see the game
- Detect possible errors (for example: disconnected
tree , proper labeling of move labels)
|
|
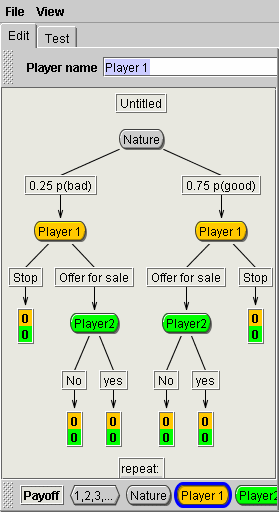
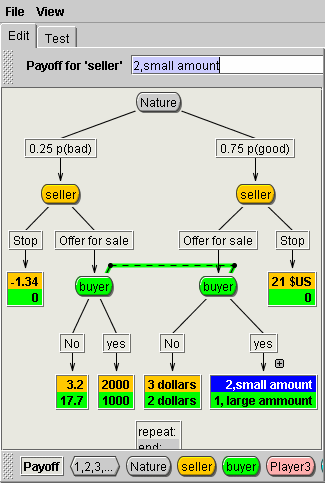
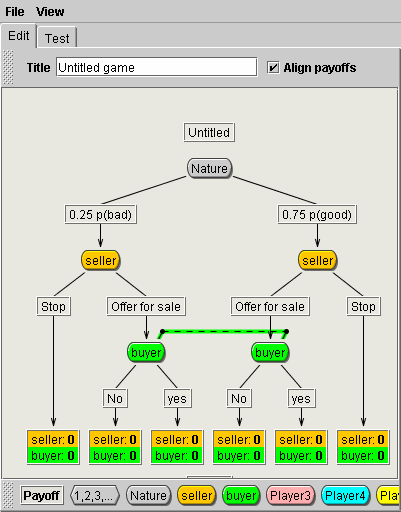
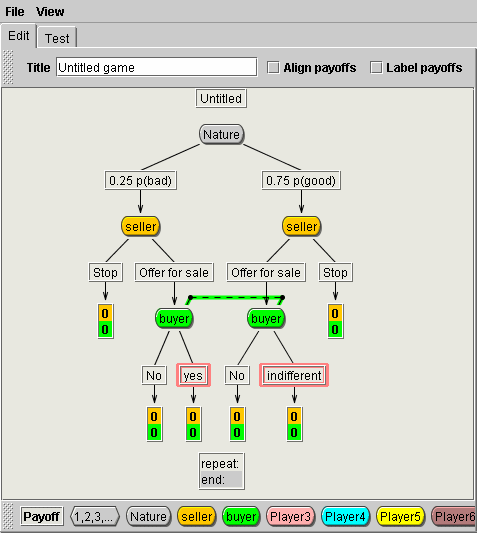
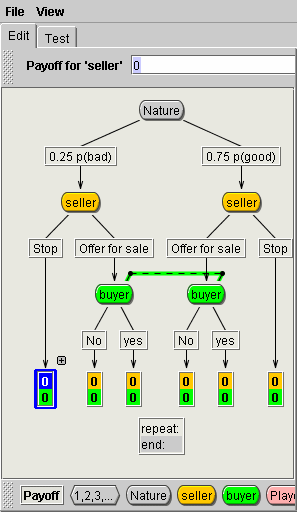
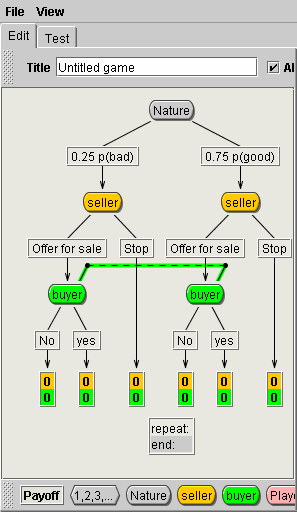
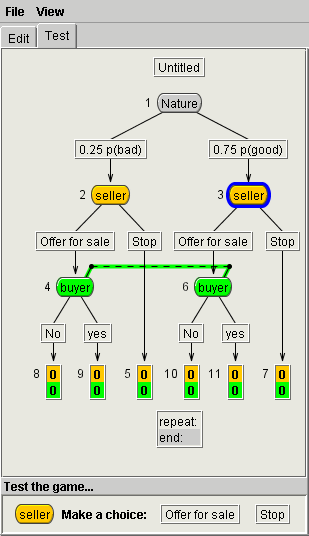
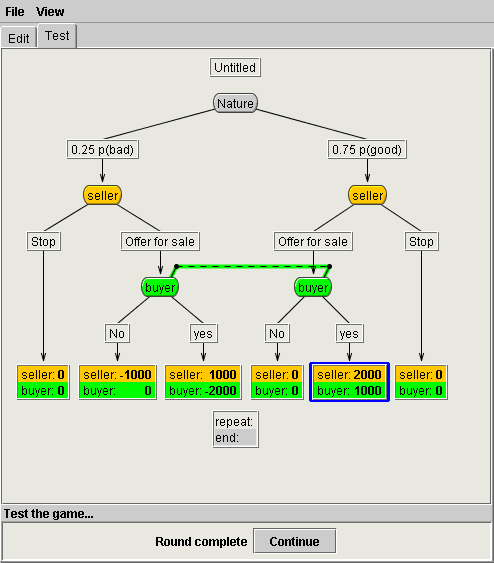
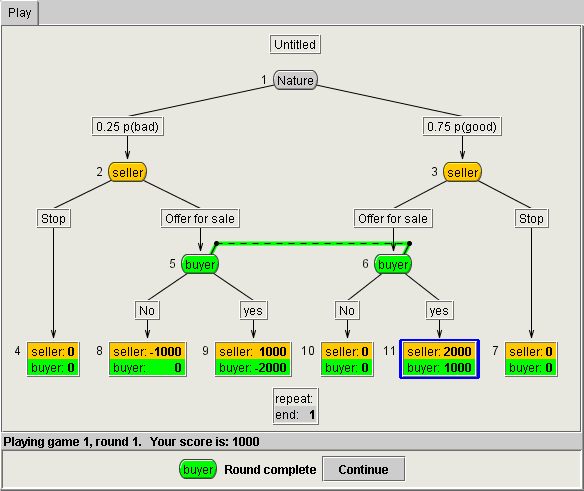
- In the Figure below the test game shows that after
Nature chose the right node, the seller chose "Offer for
Sale". To select a move, click directly on the rectangle on
the tree or at the bottom of the window where a player is prompted to
make a choice.
|
|
|
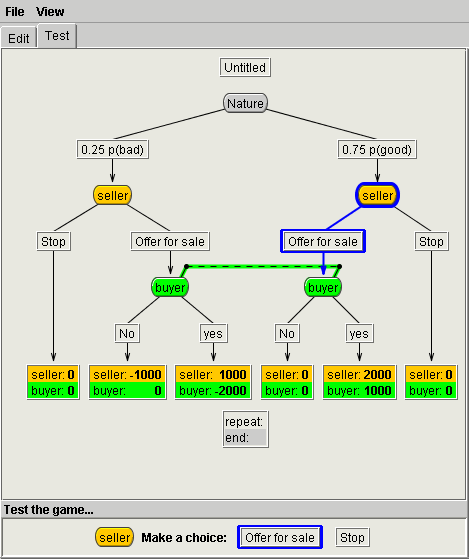
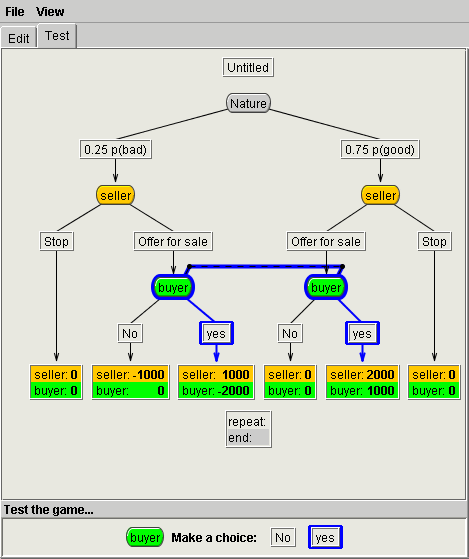
- The buyer who has two nodes with the same
information state does not know which move was chosen. For example,
when he chooses "Yes", it is highlighted on both branches.
|
|
|
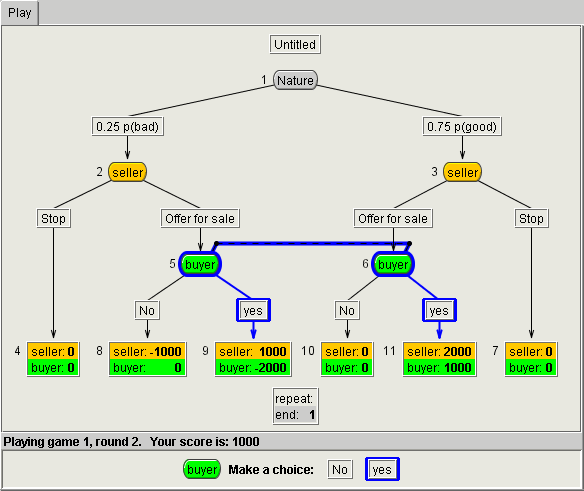
| The buyer selected
"Yes" in the example below and the results of the game show that
the seller earned 2000 in this game, and the buyer ended with 1000. |
|
|
Return to the Table of Contents
- Saving a File
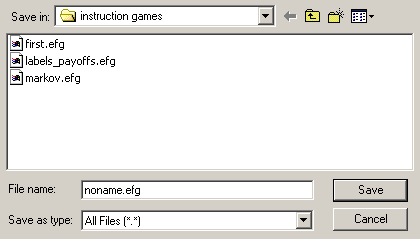
- From the File menu, choose Save or Save
As if you are the first time saving the game.
- In the File name box, type a name of the file. The
program saves the tree in the current drive and directory by default
with "efg" after the period.
- If you want to save the tree to a different drive or
directory, do one of the following:
- Select a drive and a directory
- Type a file name in a "File name" box
Choose the Save button.
4. To save the existing
file, select Save.
|
|
|
|
Return to the Table of Contents
- Running an Experiment
To run the experiment follow
the procedure described below:
- Click on File menu and select Open
- Choose the saved file representing the game you want to run
- Click on File menu, and select Run Server option.
(i.e. the window with Game Server Properties appears on the screen
like the one presented below.) |
|
Return to the Table of Contents
- Determining Session Parameters
| Session Identification:
Provides a box for typing a name for a game if the
name was not already specified while designing the game.
Rounds should be used when you want subjects to
play with the same player and with the same role:
- For a fixed ending of a game: type the total
number of rounds that a game should be repeated in a box named
"Fixed"
- For a random ending of a game type the probability
(i.e. any number in the interval [0,1]) to continue the game to the
next round in a box named "Random".
Games should be used if different role/same opponent
is selected or same role/different opponents:
- For a fixed number of games: type the total number
of games that will be played in a box named "Fixed".
- For a random ending of games: type the probability
(i.e. any number in the interval [0,1]) to continue with a new game
(i.e. change the assigned roles)
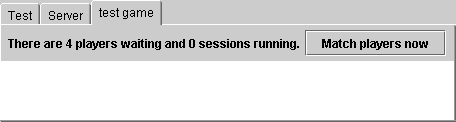
Start matching players when:
There are two options for matching players:
- if
 is selected then the matching of players will start only after
moderator clicks on "Match players now and this will appear only
after the Start of the server on a game name window (i.e. in
our case a game was named: test game).
is selected then the matching of players will start only after
moderator clicks on "Match players now and this will appear only
after the Start of the server on a game name window (i.e. in
our case a game was named: test game).
- if the option
 is selected then the matching automatically starts after the number of
people specified connected to the game. In the case 2 subjects have to
login before the roles are assigned.
is selected then the matching automatically starts after the number of
people specified connected to the game. In the case 2 subjects have to
login before the roles are assigned.
Log File:
By default efgLog-title of the game.html file appears in the box with
the option to append it to the existing file. To change the default name
click on Browse.The output file can be read by standard spreadsheet
programs (i.e.Excel)
- Click
 button to start the experiment
|
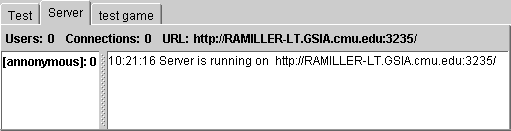
|
The window with the
instructors computer address appears on the screen like the one below
on the  page.
page.
- Provide this address to players in order for them
to connect to the experiment. Note that there are two ways for
players to connect to the running game. See the instructions on Players
connecting to the experiment.
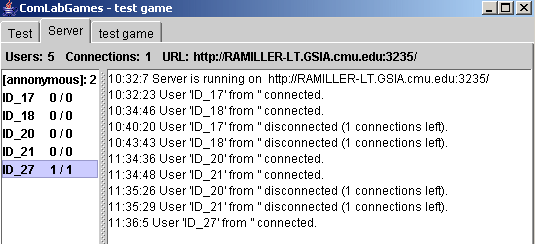
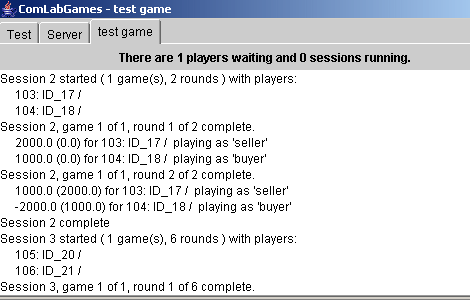
If the instructor runs several experiments (i.e.
games) from the same computer at the same time, the number at the end of
the address changes (see the Figures below). |
|

|
|
|
Return to the Table of Contents
- Experimenter/Instructor Viewing the Game
Return to the Table of Contents
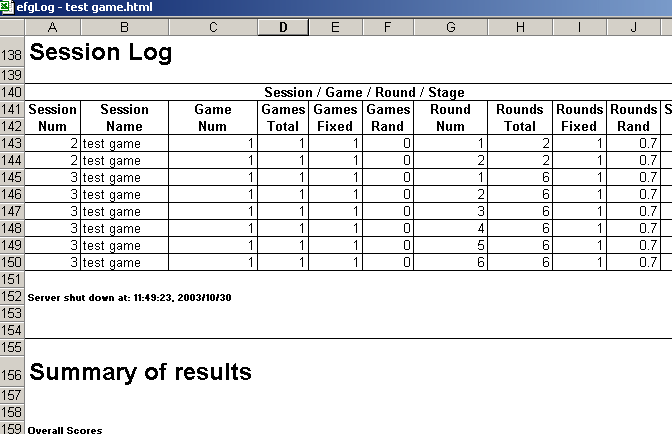
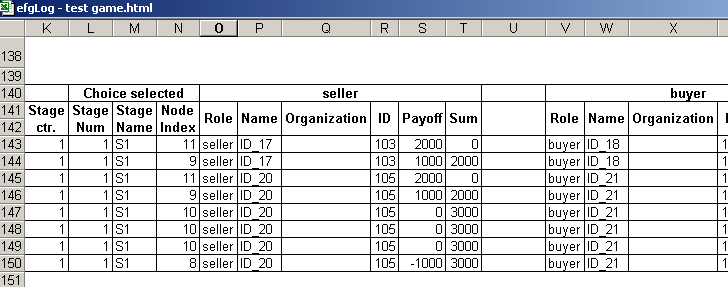
- Viewing Experimental Results
| The output file
"EfgLog-game name.html" can be imported into standard
spreadsheet program (Excel) and looks like the example below: |
|
Return to the Table of Contents
- Instructions to Players given by the Instructor
- Players Connecting to the Experiment
The following instructions
should be given to players:
Players have two options to connect to the
game:
1. Open Internet Explorer and write the address:
http://RAMILLER-LT.GSIA.cmu.edu:3235
(the one that is written in the server. Note that players have to
write the whole address with "http://"
|
|
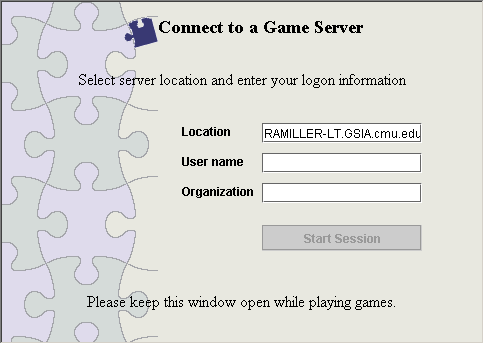
2. Go to http://www.cmu.edu/comlabgames/tree
address and click on: 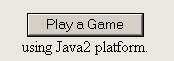 The login window like the one below opens. The players
write in the location cell the address: RAMILLER-LT.GSIA.cmu.edu:3235.
Note that the address in this case does not have "http://".
The login window like the one below opens. The players
write in the location cell the address: RAMILLER-LT.GSIA.cmu.edu:3235.
Note that the address in this case does not have "http://".
|
Return to the Table of Contents
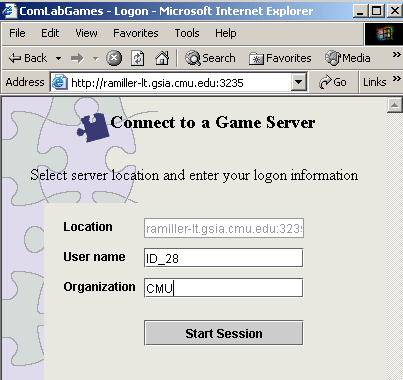
- Opening a Game by Players
| After connecting to the
address given by the instructor, a player login information appears on
the screen: |
|
|
- Write a name or ID number in the User name
box
- Write your institution or affiliation in the Organization
box
- After writing all the necessary information
described above click on Start Session to open it.
|
Return to the Table of Contents
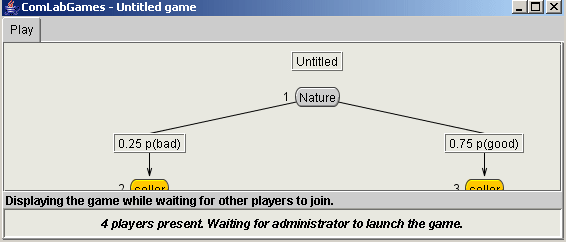
- Waiting for other Players to login
After a player launches the
game, the game appears on a players screen with the message: "1
of n players present. Waiting for more" or  if the matching by moderator was selected. When a minimum number of
players required by the game structure connects to the game (in our
example the minimum number of players are two, a seller and a buyer), or
in the second option when a moderator decides to match the players,
the players matched for that session can start selecting the moves.
if the matching by moderator was selected. When a minimum number of
players required by the game structure connects to the game (in our
example the minimum number of players are two, a seller and a buyer), or
in the second option when a moderator decides to match the players,
the players matched for that session can start selecting the moves. |
|

|
Return to the Table of Contents
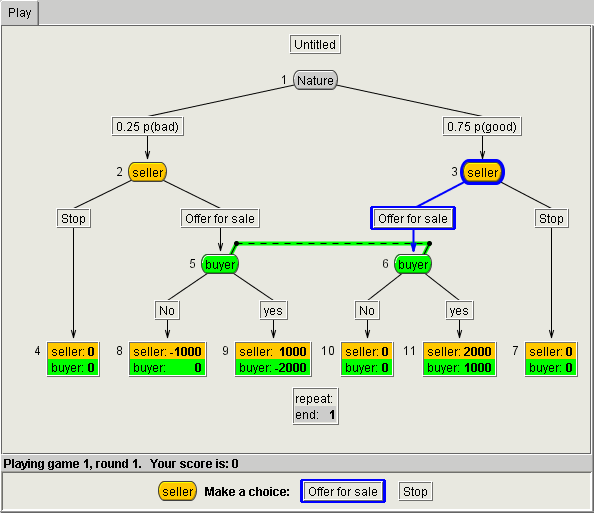
- Choosing Moves by Players
When the minimum number of
players has been connected to the game, a randomly assigned players
role appears at the bottom (i.e. in our example ,
so that a participant knows the role he was assigned to.
The choices appear next to the assigned players name
or number at the bottom of the window when the player has to make the
next move.
Players make their choices by
- clicking on one of the choices presented in the
tree or at the bottom of the window, and that choice is highlighted
in blue (i.e. In the game tree of Figure below, it is Seller who
chooses a first move after Nature. He can choose between "Offer
for Sale", and "Stop" by clicking with the mouse on
the appropriate choice. If he chooses "Offer for Sale"
then it will be a "buyer" who makes the next move. If he
chooses "Stop", then the buyer does not make a choice, and
the message appears at the bottom showing the payoffs for the
players. For that round, and the game.)
|
|
|
 makes the next move and the message appears next to the assigned role (i.e.
the choices in our example are "No" and "Yes").
makes the next move and the message appears next to the assigned role (i.e.
the choices in our example are "No" and "Yes").
A player selects a choice by clicking on
one of the available choices, and that choice is highlighted in blue. |
|
|
| When the game ends, the
terminal node that is reached is highlighted in blue and the outcome
corresponding to that terminal node is shown at the bottom of the window
for the players paired for that game. |
|
|
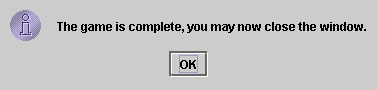
| When the game is over,
players will be informed with the message presented in the Figure.
|
Return to the Table of Contents